Voxel Terrain 2D Manual
Remember Voxel Terrain 2D is still under development and this manual is still incomplete; we are working quite hard to complete it! :)
If you have any questions, suggestions or if you need help, we will be happy to answer you at uas@gargore.com.
Index
This index can be used to navigate faster and easier to the different sections of this document:
First Steps (^ back to index)
Import the package using the asset store or assets / import package / custom package, better on an empty project the first time.
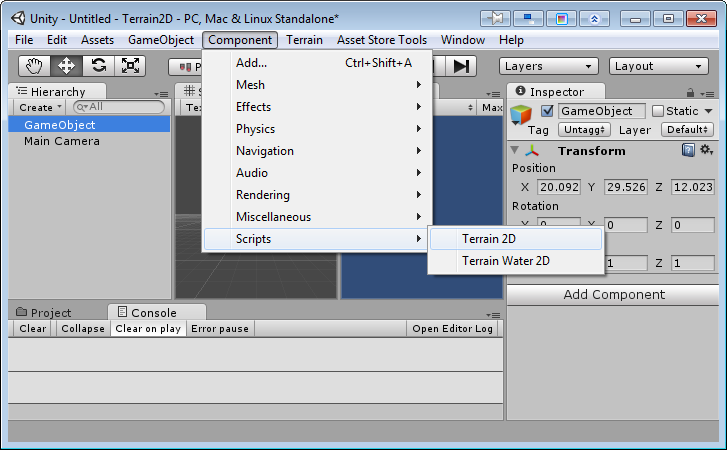
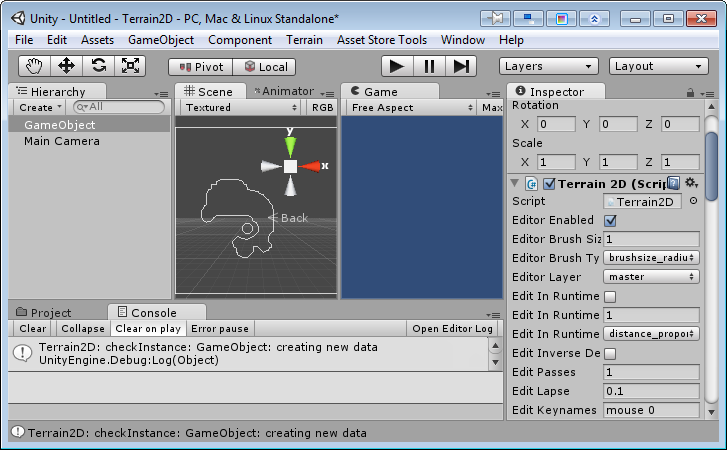
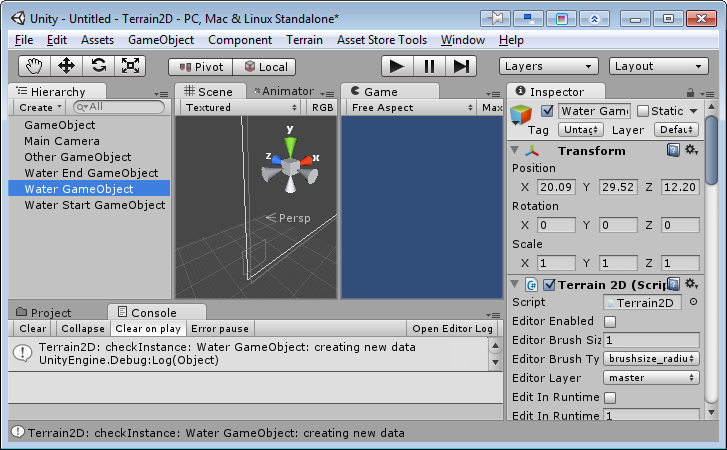
Create an empty GameObject and attach to it the script Assets / Plugins / Runtime / Terrain2D / Scripts / Terrain2D.cs
Now you can see at the inspector several properties.
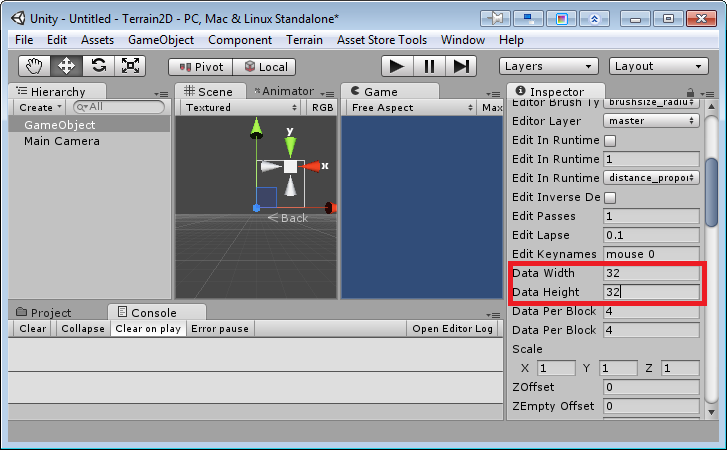
First of all you need to find Data Width and Data Height properties and define the width and height of the terrain layer. Try first small numbers like 32 or 64 to start familiarising and then increase them slowly because bigger numbers requests more memory.
Once you have configured the width and height the terrain will be drawn and you can start to look at the other properties.
Their are divided into several groups:
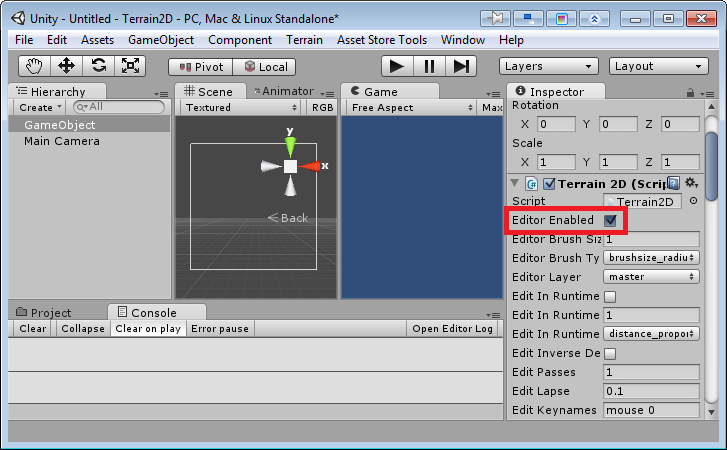
- Editor: this group is used for edit while in editor: to enable in-editor editting activate the Editor Enabled checkbox. After that you can draw over the terrain directy while in editor mode. Use the other properties under this group to change the brush size, shape and properties.
- Edit in runtime: this defines the in runtime live editting: it is very similar to the previous group.
- Edit: finally other parameters for editting. The most important is the key defined for in runtime editting. You can also edit from your own scripts by using the public members like dig or fill.
- Data: defines the data properties. The most important are Data Width and Data Height fields.
- Offsets and widths: these properties define where the different layers will be drawn.
- Material: define rendering material properties. Some complement the material properties itself.
- Layer: these properties allows you to define which rendering layers will render this Terrain2D. Because some features like back wall and front terrain requires two separate different materials, you will need to use two separate Terrain2D. For this purpose there are the Layer Master and Layer Slave properties: if you want two scripts to share the same data.
- Save: this are tweaking properties that usually do not need to be changed. These allows you to save to a file and other features, but the current version allows you to use the much more ease unity serialize interface as default.
- Neighbour: if you want to place several terrains adyacent, use these fields to define the linkages. The terrain editing will be continuous throught several terrains.
- Spawn: these properties are for debug purposes: you can test to spawn objects so you can check the colliders generation.
- Camera: these properties allows to manage the camera controlling. They are included for debug and sample purposes.
- Object: these properties are included for debug and sample purposes.
- Debug: these properties are included for debug and sample purposes.
Creating your First Terrain (^ back to index)
First of all, You need to apply the steps in the previous section (at least attach Terrain2D.cs to an empty GameObject) and, if you didn't make it yet, you NEED to find Data Width and Data Height properties (in Terrain2D script inspector) and define the width and height of the terrain layer. Try first small numbers like 32 or 64 to start familiarising and then increase them slowly because bigger numbers requests more memory and depending on your configuration can cause slowdowns.
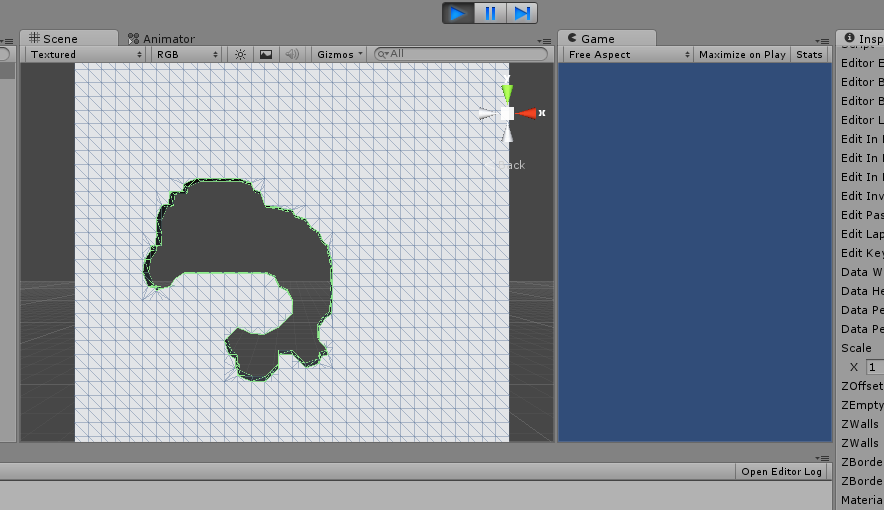
After that you will see that the size of the drawed outline (in white) enlarges. Now you can start drawing by marking Editor Enabled property.
Draw something by using mouse with LMB pressed while in the Scene View. You can only draw inside the Terrain2D boundaries. To finish you can simply select one of the unity stardard tools in the top-left corner of the unity window (move camera, move object, rotate object, scale object) to disable the editor mode.

Move or rotate the Terrain2D GameObject for example. After that if you want to continue editting you will need to check again the Editor Enabled property. Note that checking Editor Enabled automatically disables the Unity tool. It is normal and it is required because Terrain2D needs to take control of the input.
By default you will be digging a fully filled terrain. To fill temporarily some digging that you made before hold left shift while drawing with LMB.
You can change brush mode or size by using Editor properties.
When you are ready, press play or run and the mesh will be generated.
You can edit also in runtime but usually you will use the dig/fill public methods of Terrain2D for digging or making explosions. Both methods are easy-to-use with three simple parameters: Vector3D position (a 3D vector with the world position, let z = 0 for 2D games), float brushsize (radius of the brush, or of the explosion), float ammount (the ammout of material to add or remove: each data handles values between 0 and 1).
Adding a Background Layer (^ back to index)
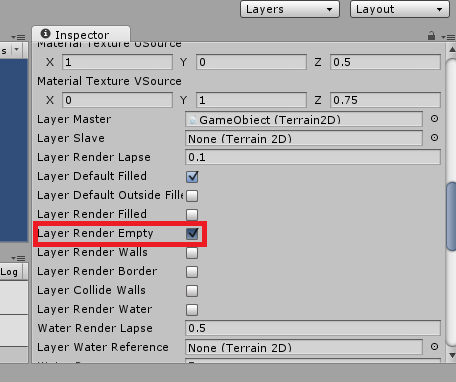
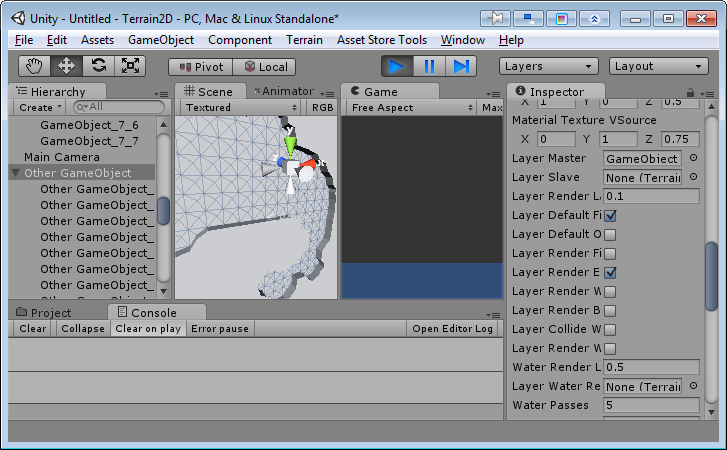
For the moment we didn't add a background wall geometry. If you simply mark Layer Render Empty property the wall geometry will be generated in the same material and depth that the front material.
For changing this simply create a new GameObject, attach another Terrain2D and select as Layer Master property the Terrain2D that you already had. Enable Layer Render Empty and disable all other layer render properties and layer collide walls.
Now if you run again the scene you will see that both gameobjects have generated the complementary geometry. Stop the scene and move the newer gameobject in the z axis if you want to add depth.
Finally remember that Layer Slaves could not be editted: use the Layer Master for editting and do not set Data Width or Data Height: if you set it the generated data will be discarded as long as the modified layer is set as an slave.
You can add INDEPENDENT layers at different depths by repeating the steps in CREATING YOUR FIRST TERRAIN chapter (without linking them as slave).
Finally each layer can have one slave or one master (and not both fields can be filled). If you link several slave-chain-Terrain2D then the behaviour is not warrantied.
Adding Water (beta) (^ back to index)
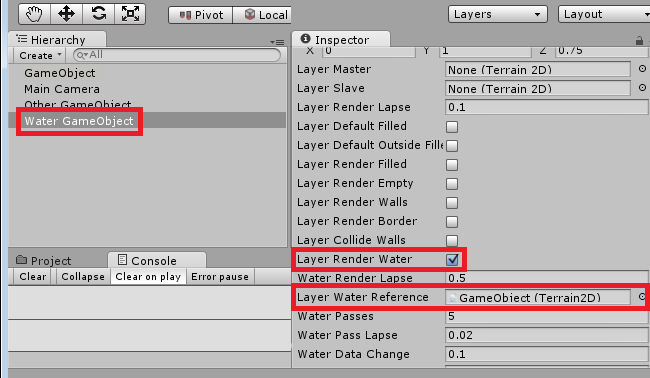
Water is added into a separate layer (not master, not slave). But water interacts with terrain. For marking which Terrain2D use as terrain set the Layer Water Reference field. You must select a independent or master Terrain2D.
Usually you must set Water Terrain2D at the same or bigger x2 x3 or x4 Data Width and Data Height than the reference. Both GameObjects should be aligned and scaled so its aparent position and sizes match, otherwise you will get strange visual effects.
For enabling the Terrain2D as water renderer you must enable the Layer Render Water property (and usually disable all the others). Also select a water/transparent material (otherwise the water will be rendered as the same terrain material that was selected. Use the Material property for select the material that you want to use.
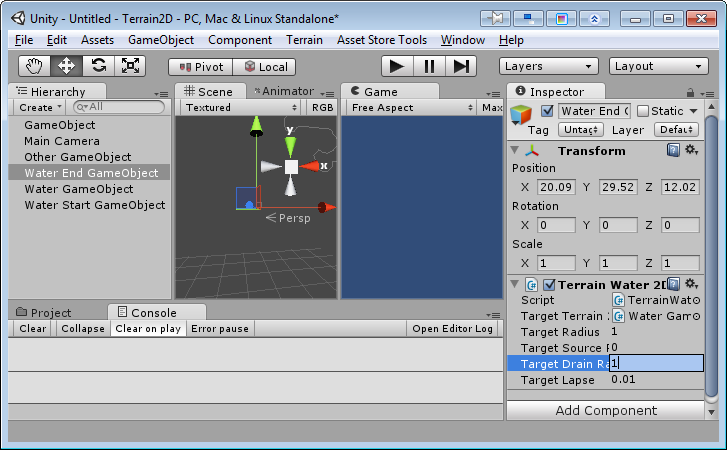
Finally for adding a water generator or drainage attach a new empty GameObject and attach TerrainWater2D script. Select the target Terrain2D (usually should be a Water layer manager. Select the radius (more radius, more water and size) and the source rate or drain rate (usually 0 or 1 are good values to start).
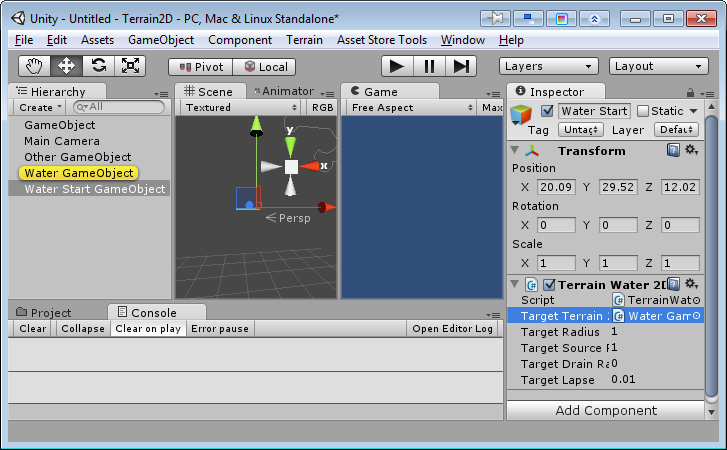
The water generator will infere from its relative position from the water layer the cell in which the water should be generated or drained.
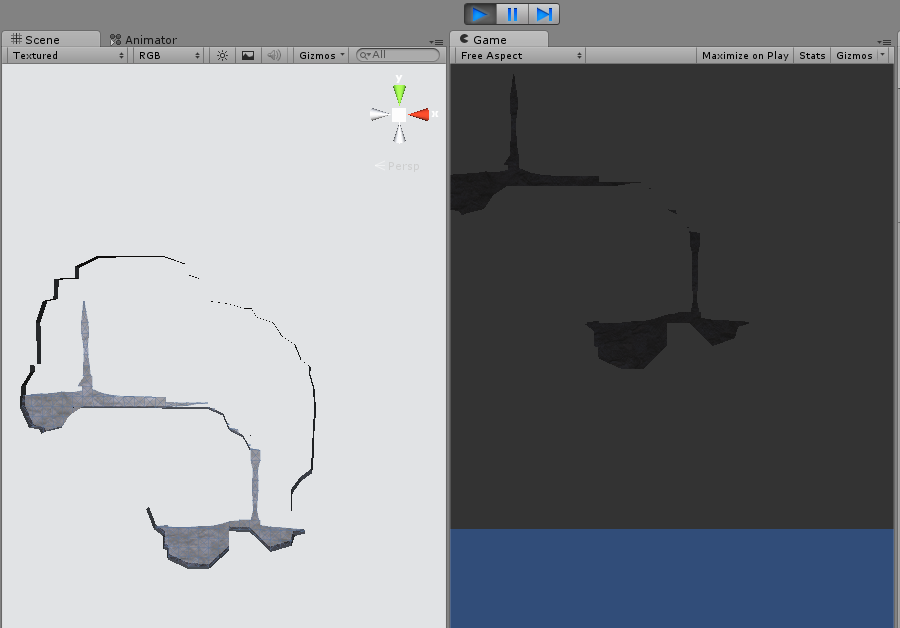
Check that the depth positions of the different layers are ok. Water layer must be placed between the background and the master layer, otherwise it will be beyond them and therefor hidden.
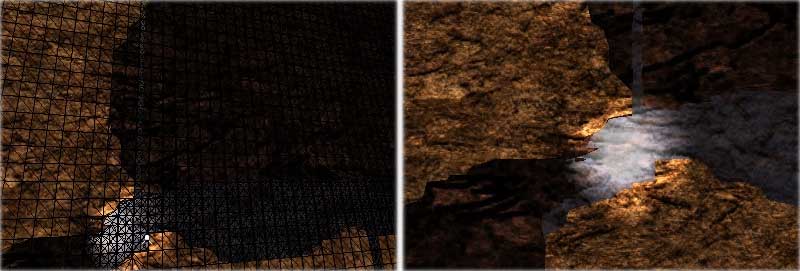
It is time: change the material of the water layer (look for a property called Material and select a different material, for example you can select example0w material, included in the examples and which is blue-translucid. Draw some figures and place the water generator and drainer, run the scene and you should have a small river flushing.
Properties Description (^ back to index)
Here is the list of all the properties:
- Editor Enabled: toggle this flag to enable editor. This will disable the translate/rotate/scale tools in Unity and will enable the gizmos. Use once enabled the Scene view to edit the contents.
- Editor Brush Size: select the brush size multiplier. The final brush size depends both on this value and in the brush type. The camera zoom can also modify the brush size depending on the brush type.
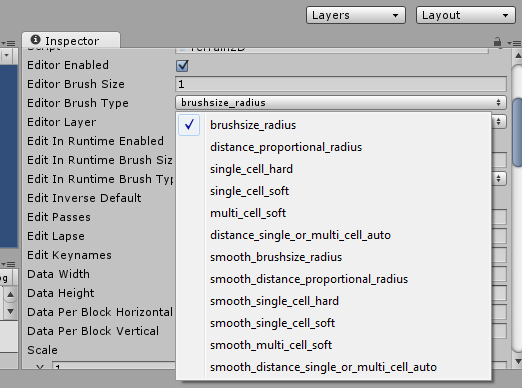
- Editor Brush Type: select the brush type. Each type has a different sizing and hardness. Try the different presets and then draw in the Scene view to test them.
- Editor Layer: this allows to edit auxiliar layers if conditional compiling allows so. Usually this property must be set to master always.
- Edit In Runtime Enabled: enables the runtime mode editting tool. Note that you can use dig or fill Terrain2D public methods even with this flag disabled. This flag is only for edit in runtime with mouse directly, on most games should be kept disabled unless you want to use this tool for your ingame editor mode.
- Edit In Runtime Brush Size: same as Editor Brush Size but for runtime mode editting.
- Edit In Runtime Brush Type: same as Editor Brush Type but for runtime mode editting.
- Edit Inverse Default: if you press shift you will invert the editting mode (instead of digging you will fill). If this flag is enabled the shift will work inverted (when pressed you will dig and when released you will fill).
- Edit Passes: how many passes should be performed per editting frame. The more passes, the more brush opacity.
- Edit Lapse: how many time between editting frames. The lesser value, the more flux or editting speed.
- Edit Keynames: edit keys for in runtime editting tool separated with ";".
- Data Width: the width in data cells of this layer. Don't use very big values because bigger layers demands lots of memory.
- Data Height: the height in data cells of this layer. Don't use very big values.
- Data Per Block Horizontal: the layer is divided in blocks. Each block has n x m data cells. This value is n.
- Data Per Block Vertical: the layer is divided in blocks. Each block has n x m data cells. This value is m.
- Scale: the scale of the layer. Modifying this vector you will get different sized layers without using more data cells.
- ZOffset: the z position, relative to the GameObject position where the filled foreground polygons will be placed.
- ZEmpty Offset: the z position, relative to the GameObject position where the empty background polygons will be placed.
- ZWalls Offset: the z position, relative to the GameObject position where the wall polygons start will be placed.
- ZWalls Width: the z width of the walls, where the walls polygons will end.
- ZBorder Offset: the z position, relative to the GameObject position where the border polygons will be placed.
- ZBorder Width: the width of the border band.
- Material: the material to use in the blocks generated for this layer.
- Material Texture Tiling: this will be used for the tiling values of each one of the generated blocks.
- Material Texture Offset: this will be used for the tiling offset values of each one of the generated blocks.
- Material Texture USource: this value will modify the u values in the block meshes, usually you should keep it to: (1, 0, 0).
- Material Texture VSource: this value will modify the v values in the block meshes, usually you should keep it to: (0, 1, 0), sometimes you can use smaller values on last component, for example: (0, 1, 0.25).
- Layer Master: fill this property with a reference to the layer master if this is a slave layer. Sometimes you want to use the same data cell array but render other polygons or in a slightly different position, or use different materials for foreground and background. Then you will need to use two linked layers. Slave layers will ignore they own data and will use the master's data, so you only need to edit the master layer. All the brush edit data in a slave layer will be dropped while in runtime.
- Layer Slave: same as Layer Master, but fill this property with the layer slave if this is a master layer.
- Layer Render Lapse: when changes are done in runtime in a layer, this is the lapse between frames (the inverse value of the framerate, for example, for using 10fps write 0.1 (the recommended value).
- Layer Default Filled: check this flag if you want to invert the filling status quickly without further editting.
- Layer Default Outside Filled: this flag tells the library if you want to render contents as if outside the layer boundaries (up, down, left, right) the cells where filled or empty).
- Layer Render Filled: Layer Render values make that the library generates and renders the geometry related to various parts of the terrain. In this case the filled mesh is the polygons where the data cells are filled.
- Layer Render Empty: same, but for the background walls of empty data cells.
- Layer Render Walls: the walls.
- Layer Render Border: the border around filled polygons, this will work only on some setups and versions.
- Layer Collide Walls: generate the 3D colliders, usually you must enable this flag only in master layer.
- Layer Collide Walls 2D: generate the 2D colliders, don't enable both 3D and 2D colliders in the same layer because unity will not allow to init both components.
- Layer Render Water: render the water polygons, usually you must use a separated layer for water.
- Water Render Lapse: the lapse between water renderings. lapse = 1 / fps or fps = 1 / lapse. Don't use very high fps values, otherwise the library have to generate the water too much often and your game global framerate will be affected.
- Layer Water Reference: use this layer as reference for water. The reference is the terrain filled layer that is used to calculate where water cannot be. Usually set this to the master layer.
- Water Passes: the ammount of water simulation passes. The more passes the more fluid the water will be. Only one rendering will be performed.
- Water Pass Lapse: the lapse between passes. This affect water physics.
- Water Data Change: the ammount of data cells that will flow on each update. The more value, the more fluid the water will be. Remember that water IS NOT A SUPERFLUID, so you should keep here the default values or make small changes and test each time the results.
- Special Keynames: this is the setting for the special tool in runtime.
- Save Enabled: set this flag to enabled if you want to enable runtime layer saves. Usually you should use in editor editting and use serialization as saving mechanism, so usually this flag should be disabled.
- Save Keynames: the save key for runtime mode. A data file will be generated when this key is pressed. If Save Enabled is false this key will be ignored.
- Save Record Name: the data file name.
- Save Auto Load File: enable this flag if you want that the layer autoloads the contents of the data file. Usually you should use serialization and keep this flag disabled.
- Save Auto Load Serialize: autoload the serialized values. This flag should be enabled if you want to use serialized data.
- Save Force Load Serialize: this flag is for some special setups. Usually should be keep disabled.
- Save Force Dump Serialize: this flag is for some special setups. Usually should be keep disabled.
- Neighbour Xm Ym: neighbours allow you to connect several layers for making paging. Xm Ym is the connected layer positioned at Xminus and Yminus, in other words: placed in lower values of X (on the left) and on lower values of Y (on the bottom): the lower-left neightbor. This only connects datacells: you MUST place the layers GameObject in the appropiatte positions.
- Neighbour Ym: same but for the Yminus neighbor: the lower neightbor.
- Neighbour Xp Ym: same but for the Xplus Yminus neighbor: the lower-right neightbor.
- Neighbour Xm: same but for the Xminus neighbor: the left neightbor.
- Neighbour Xp: same but for the Xplus neighbor: the right neightbor.
- Neighbour Xm Yp: same but for the Xminus Yplus neighbor: the upper-left neightbor.
- Neighbour Yp: same but for the Yplus neighbor: the upper neightbor.
- Neighbour Xp Yp: same but for the Xplus Yplus neighbor: the upper-right neightbor. REMEMBER: this only connects the data cells: you MUST place the layers GameObject in the appropiatte positions.
- Spawn Enabled: spawing of objects: this is only used in testing demos for spawn spheres for testing colliders. Usually must be keep disabled.
- Spawn Keynames: the spawning keys, separated by ;. Usually used only in provided demos.
- Camera Management: if true the builtin camera management will be enabled. This property must be disabled on most game setups for avoiding cause camera problems. Usually used only in provided demos.
- Camera Hold: enable the camera hold (hold disables temporary the camera management). Usually used only in provided demos.
- Camera Hold Keynames: key for enabling camera hold. Usually used only in provided demos.
- Object Hold: enable object hold positions. Usually used only in provided demos.
- Object Hold Delta: Usually used only in provided demos.
- Debug Messages: enable this if you want debug messages.
- Debug Probe: you can assign here a GUIText if you want to receive debug messages thru that GUIText.
Usually you should use only the properties explained in the tutorials, but sometimes you will need to use one of the additional properties. Save always a backup of your scene before starting to test properties that you didn't test before or whose real impact you don't know.
This list includes also some properties that are only availables when some conditional compiling flags are enabled. Other properties are only available in the latest betas. If you don't see any of these properties on your library version, probably it will not be important: it's better that you don't change conditional compiling because some flags enable beta code which can be not very stable in your version.
Script interface (^ back to index)
Terrain2D class exports some public methods that ease the task of terrain editting via script.
Get a Terrain2D instance reference using GameObject.GetComponent or by defining a Terrain2D property on your own script.
Once you get a terrain2d reference you can call dig or fill methods. Both have 3 parameters: Vector3 pos, float brushsize and float ammount.
pos is a Vector3 position in the 3D world. Terrain2D itself will convert the position into the corresponding position in the 2D plane. You can pass also a Vector2 as it will be converted automatically.
brushsize is a float which is the size of the brush. The bigger the size, the bigger the dig or fill area.
ammount is the ammount of terrain to remove or add. It is like the "opacity".
You can call dig or fill passing directly your script's gameobject position, example: calling terrain2D.dig(transform.position, 1.0f, 1.0f) will remove terrain.
Future Additions (^ back to index)
This manual will include in the future more sections. Meanwhile please feel free to ask you what you want mailing to: uas@gargore.com.